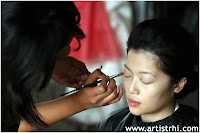
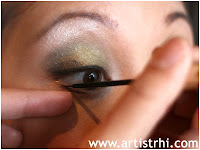
hdr_artistrhi_title

Beauty 101 Archive

Get your beauty education on from beauty basics to more advanced make-up techniques.

BEAUTY 101 | When to Chuck Your Make-up

Unfortunately, unlike the make-up line with the name, make-up may last a day, but it does not last forever! I love to get the most value for my make-up so it’s always a difficult day when I have to clean out my kit. But for the sake of being plain old sanitary, a little bit of pain is worth it! Here are some guidelines for when it’s time to let go, as difficult as it may be:

EYES
i). MASCARA

Each time you open the mascara tube, remove the wand and insert it back in, it pumps air into the tube which promotes for the growth of bacteria inside the tube. It’s best to not mess with a sensitive area like the eyes. Watch out for telltale signs…as soon as it starts to smell funky, it’s time to say goodbye!
Life span: 2-3 months

NOTE: Same rule applies to liquid liner. your eyes will thank you for it!

ii). PENCIL EYELINER
Pencil is usually good for a year, as long as it is sharpened frequently. Provided you use it frequently enough, most eyeliner pencils do not make it to the one year mark before you need a new one. If the eyeliner was once creamy, and you notice the product has lost its potency and no longer goes on smoothly, it’s definitely toss-it time.
Life Span:
1 year

FACE
i). POWDER
Of all items, powdered products generally last the longest. Just like any other make-up product, they contain preservatives that help them to last longer. Once these puppies are first used, I would say using them for the next 18 months to maximum 2 years at best. Anything older than that…well, that gives you an excuse to go make-up shopping!
Life Span:
18 months – 2 years

ii). CONCEALER
Depending on its formulation, concealer can last anywhere from 6 months to 1 year. Liquid concealers tend to have a shorter life span, where as the pot concealers (that have a thicker, paste consistency) tend to go the one year duration. Concealer is generally used everyday and is one of the make-up products that is exposed to air more frequently which allows room for bacterial growth. When using concealer, make sure you use clean brushes always to avoid cross-contamination and to reduce the appearance of bacteria.
Life span:
6 months to 1 year

iii). BLUSH
Anytime a product is exposed to air or a brush that has been in direct contact with your skin and then used back and forth between the product and skin, the chances for bacteria to grow increase. This is why it is important to use clean tools all the time. Brushes should be cleaned after each use.
Life Span: 18 mos – 2 years


LIPS
i). LIPSTICK

Some people will advise that lipstick can last up to 2 years. Lipsticks are comprised of preservatives and a host of different waxes to give the product its longevity. I find usually by the 18 month point, lipstick tends to not blend/apply in the same manner and it becomes a bit tougher to work with. As soon as lipstick starts to smell or glide on funky, treat your lips to some new products.
Life Span:
18 months – 2 years

ii). LIPLINER
Similar to pencil eyeliners, lipliners can last up to one year, provided that they are sharpened regularly. Since the mouth area can harbour a lot of germs and bacteria, it is better that you sharpen your lipliner everyday. I would suggest spraying it with 99% alcohol to ward off any bacteria, but the concentration of alcohol would dry out the the lipliner before you maxed out its usage.
Life Span:
1 year

Posted in Beauty 101 | Tagged , ,

GET THE LOOK | Metal-eyes

What better to accentuate tanned summer skin tones than some metal eyeshadows that are all the rage this season?

To get the look:
1. Use a neutral cream eyeshadow as a base to help give eyeshadow more staying power, especially in the heat of summer. Spread from lash line to eyebrow using your finger. Try MAC Paint Pot in Soft Ochre or MAC Paint in Bare Canvas.

2. Take a medium tone neutral eyeshadow and apply all over eyelid using a flat sponge tip applicator.

3. Take a dark tone eyeshadow and use a crease brush to concentrate the colour where the eye folds. Then, using a blender brush, blend and get rid of any harsh lines. The look should be soft and diffused.

4. Use a flat sponge tip applicator with a metallic pigment (loose powder shadow) to get an intense metal look.

5. Use a highlighting tone of eyeshadow in a matte finish (off-white on fair skin tones, cream colour on medium tones and peach for darker skin tones.) Based on personal preference, you can opt to also use a shimmery finish for the highlighting eyeshadow. I like to keep the shimmer in one area (i.e. just on the eye lid), just so the eye doesn’t look so ‘busy’ and detract away from the main focus around the eyes.

6. Apply eyeliner to add emphasis to the eyes and lash line.

7. Pump up the volume with an eyelash curler and two coats of a black thickening mascara.

8. Keep the cheeks and lips soft with peachy-pink tones so the attention is kept on the eyes.

Metallic shades that work best:
Fair Skin Tones – pale gold, silvers
Medium Skin Tones – gold, copper, bronze
Dark Skin Tones – silver, gold, deep bronze

Posted in Beauty 101, Get the Look | Tagged , ,

ARTIST TIP | Primer is Your Friend

For more make-up staying power, especially when it comes to wearing your foundation, try using a make-up primer post morning routine of cleansing and moisturizing your face and pre make-up application.

Why use a primer?

Primer works to smooth out the surface of the skin, by filling in little pores and ridges, helping to give the skin a more uniform surface. Primers are mainly comprised of silicones, so it sits atop the skin, as a smoothing layer between the skin and foundation. The better primers also act as ‘mattifiers’ and help to absorb oil (and thus reduce make-up transfer) throughout the day. Primers are an added step and the better ones are pricey, but you only need to use a pea-sized amount in the areas that are more shine-prone. It will help to promote the daily longevity of your foundation and concealer without the need for touch-ups throughout the day, so you’ll be using less and saving in that way!

How to use:
1. Squeeze a pea-sized drop onto finger and distribute evenly on face.
2. Give it a minute to dry.
3. Proceed with foundation application.

Who it works best for:
Foundation wearers and oil-prone skin types

Recommended products:
Inglot Under Make-Up Base ($27)
Smashbox Primer ($37+)

Posted in Artist Tip, Beauty 101 | Tagged , ,

BEAUTY 101 | Using Coloured Concealer

Ever looked at coloured concealer (or foundation) and thought what crazy new make-up gimmick are they trying to get me to buy into now?

The idea behind colour concealer and foundation derives from the colour wheel. Colours that sit opposite of each other on the colour wheel are used to contrast one another. For instance, green and red are opposites on the colour wheel so green concealer is used to neutralize and conceal blemishes, rosacea and other areas of redness in the skin. Dig it?

Here’s a brief overview of what coloured concealers and foundations can offer you:

  • GREEN
    - tone down redness
    - perfect for blemishes, skin that is prone to redness (i.e. rosacea)
  • PEACH
    - brighten dark spots (I love to use it under the eyes), lighten areas of the skin damaged by the sun
    - use for medium yellow to olive skintones
  • MAUVE
    - brighten and balance sallow medium yellow skintones

  • YELLOW
    - brighten dark spots/undereye circles
    - use for light warm to medium yellow skintones
  • WHITE (cool)
    - use it to brighten dark spots or to lighten foundation colours

  • CREAM (WHITE – warm)
    - use it to brighten dark spots or to lighten warm, yellow-based foundation.
What kind of formula do I look for?
For blemishes and smaller areas, choose a creamy paste-like, stickier formula. For larger areas, use a lighter liquid texture, as creams will be too obvious when covering these larger areas.

Recommended products:
Lise Watier’s concealer portfolio (pictured above) comes in both a palette for light and dark skin tones. The palette contains all the colour correctors needed right at your finger tips, which is particularly ideal for make-up artists who don’t always have time to fumble around searching their kits for different products!

For under the eyes, I like to layer MAC’s Select Cover in Peach to brighten the under eye area. I always make sure I have at least two of these in my kit, as I tend to go through them pretty quickly.

When all else fails…
If all else fails, it is better to just skip the colour concealer and foundation altogether and instead use your skin-tone coloured one. After all, you don’t want to look like the Incredible Hulk when all is said and done with the colour correctors!

Posted in Beauty 101, Product Review | Tagged , , , , , , , , ,

Q & A | How do I make lipstick last longer?

How do I make my lipstick last longer?

This is one of the most frequent questions (or complaints) that I hear from women that I work with. Most of the lip products that claim to have staying power tend to be more of a matte formula and dry out the lips. The result is that you have to touch up your lips anyway to keep them looking fresh. Try a couple of the tips below to help colour stay put (and stay great!) throughout the day:

(Pre-prep for the lips: Keep your lips soft and supple by moisturizing at least twice per day – once in the morning after you wash your face but before you apply your make-up, then again at night before bedtime. Try Kiehl’s No. 1 Lip Balm.)

1. Prep the lips by using excess cream concealer/foundation and lightly pat it onto the lips. This gives the lipstick colour a base to hold onto.

2. Using a sharpened lip pencil, line the lips following the natural shape of the lips, lining only slightly inside or slightly outside the natural lip line. Now, blend the lipliner inward, using a brush. This will again act as a reinforcement for the lip colour being applied atop of it and prevent feathering/bleeding of the lip colour. Use a lipliner that either closely matches the lip colour you will be applying, or opt for a neutral toned lipliner to keep your colour in check.

3. Apply lipstick. I prefer to use a lip brush, as I find applying the lipstick tube directly on the lips leaves an excessive amount. A lip brush will give you greater control with the amount of product that gets applied. Remember, less is more and you can always start off lightly and then apply another layer as you desire! Take a one ply tissue and blot with the tissue in between the lips. Reapply the lip colour with a brush.

What type of lipstick do I choose?
Choose lipsticks that are ‘satin’ or ‘creme’ finishes to give lips a kissable look. You likely will have to touch it up at least once throughout the day, but at least it will not leave your lips raw when you try to remove it, as matte and other long-lasting lip products tend to do.

4. For some added glam, punch up the lips with a layer of gloss atop the lip colour. Choose glosses that have a bit of stick to them for some added staying power. Avoid glosses that are too sticky, as they tend to be a nuisance when your hair blows in the wind (and when you go to kiss that special someone).

Now, pucker up and you’re set to go!

Here are some brands to try:
Lipstick
Make-up Forever – Try the Lacquered Lips collection. It lives up to its name.
MAC – An industry staple with undeniable colour and texture selection.
Clinique Colour Surge Butter Shine Lipstick – Just like the name…it’s like butta, baby!

Lip Gloss
Lancome Juicy Tubes – A fan favourite with every colour of the rainbow (and flavour of a candy store!).
NARS – Orgasm. A follow-up to the popular blush of the same name – need I say more?


Posted in Beauty 101, Q&A | Tagged , , , , , , ,