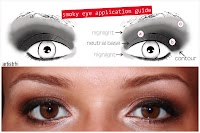
 I recently held a make-up lesson with two amazing and quick-learning clients (thanks A. and S.!). We focused on doing a smoky eye look for the lesson, and it reminded me how (understandably!) many women have questions on how to do it or how to improve on it.
The template at right (an oldie but a goodie!) is meant to be an approximate guideline for where the shades of eyeshadow go. Keep it in mind (and click it to enlarge it) – we’ll refer back to it frequently throughout the next few posts we do on the smoky eye technique.
—–
Smoky Eye FAQ #3: Do I need to spend on expensive brushes and eyeshadows?
Not necessarily – there are great products out there at all pricepoints. Yet, as a make-up artist and a make-up lover, I will admit that I have found better success (in other words, less frustration) using products (both on others and on myself) when the products are of department store quality, particularly for brushes. Some drug store brands may seem like a good deal, but you can dig and dig at an eyeshadow for barely any colour pay-off, while some brushes are too rough or stiff for a delicate area like the eyes!
I know it can be quite the investment to spend on brushes and good quality eyeshadows, but well-pigmented eyeshadow will last you well towards (even past) their expiry date (of approximately 2 years) and brushes will last you for years to come, provided that you take care of them properly!
Moral of the story: the tools you work with make a difference.
See here for more info on specific brush types that really help me with achieving a smoky eye.


