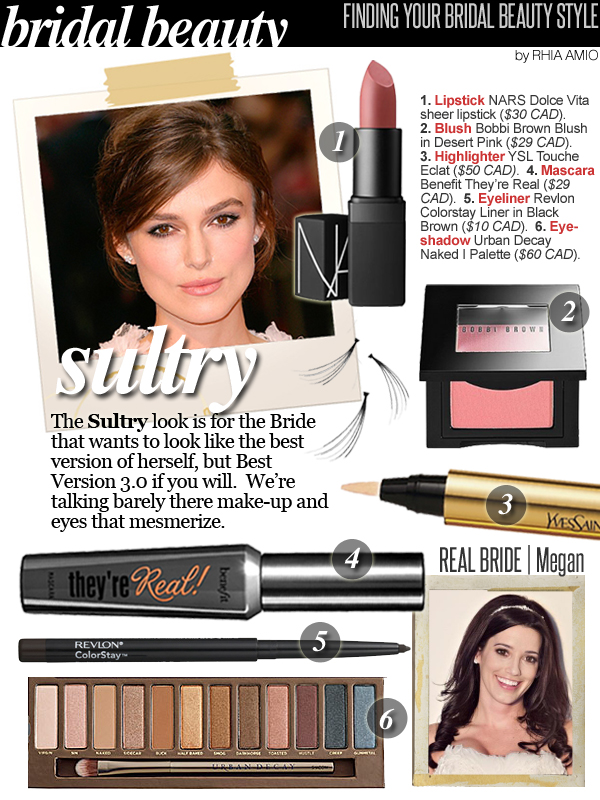
The Sultry Bridal Beauty look is for the Bride who wants to look like the best version of herself, but with focus on stand-out (and not overdone) eyes. Â Here’s how to get this look:
Focus on Eyes
i). Â Revlon Colorstay Eyeliner in Black Brown
Trace the eyes, top and bottom, with a long-lasting pencil eyeliner like Revlon’s Colorstay liner in Black Brown. Â I’ve tried many a ‘long-lasting’ and ‘waterproof’ eyeliner in my lifetime, and this one by Revlon works just as well as ones by Make-up Forever and Urban Decay. Â I opt for Black Brown to keep the look less harsh. Â If you prefer the look to be more intense or if you have a deeper skin tone, then use a black eyeliner.
Note: Â the line that you draw should be thick enough to see but tight to the lashline. Â The line also need not be perfect, as you’ll be blending and layering eyeshadow over it.
ii). Â Urban Decay Naked I Eyeshadow Palette
You knew the Naked palette was going to have a mention somewhere amongst these bridal beauty posts! Â The Naked palette is a favourite of make-up artists and beauty bloggers, for its range of wearable neutral colours. Â You can easily get a variety of looks – from natural to smoky – within this one palette. Â Aaand, there’s more to love! Â aka the value. Â We’re talking 12 eyeshadow colours for $60, which is way better than buying all of these colours as individual products.
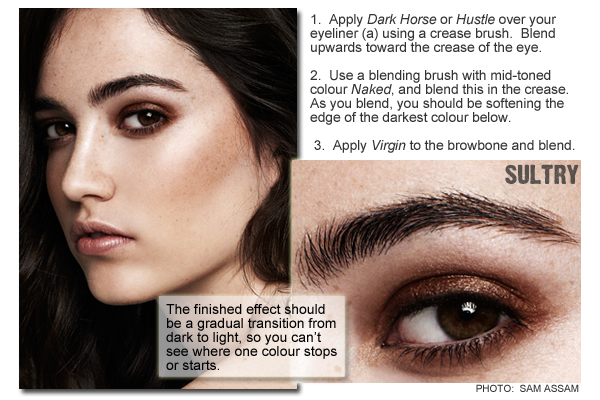
To get the Sultry eye, use a crease brush with one of the deep brown colours (either Dark Horse or Hustle) and layer over your pencil eyeliner. Smudge and blend the eyeshadow all around the eye. For the top part of the lid, focus application mainly on the eyelid and only slightly into the crease.
Next, use Naked as a transition colour and blend into the crease so any harsh edges (from the darker colour applied previously) have instead a soft, gradual fade.
Lastly, top it off with Virgin to highlight the browbone and again blend out any harsh lines from the transition colour. Â See more below:

Note: Â If you prefer more depth or something less brown looking, use the black shade Creep or the grey shade Gunmetal in the palette – the reflective metallic finishes of these eyeshadows help make sure the final result is not too dark or smoky. Â Just use a tiny bit at a time and layer as needed for your desired intensity. Â Less is more with this look!
Since you’re bringing major attention to the eyes, you’ll also need to make sure the areas that surround your eyes – your brows and the undereye areas – are in check! Â The cult classic YSL Touche Eclat is the perfect brightening trick for pesky dark circles. Â Use this brightener combined with your concealer for an instant pick-me-up…and no one will know you were up til the wee hours of the morning writing your thank-you speech!
ARTIST TIP: Â Do your concealer after your eyeshadow so any eyeshadow bits that go astray are easy to clean up and erase. Â It saves you from having to do double the work!
To top off the eye look, curl your lashes and add major jet-black volume with Benefit’s They’re Real Mascara (because our lashes often need a little push-up help too!) :)  I love the way the bristles wrap on the dome tip of the They’re Real mascara wand – it helps me get even the tiny hairs and helps keep my outer lashes separated and defined.
If the price is a bit of a beauty indulgence, luckily, there are alternatives at the drugstore level.  Maybelline’s The Rocket Volume Express and Cover Girl’s Lash Blast, both usually priced around the $10 mark, are both tried and tested favourites for instant bold lash volume.  Whichever mascara you opt for, just make sure it’s also waterproof for your wedding day!
Subtlety is key.
Keep the rest of your make-up subtle. Â Stay away from major pops of colour and steer towards colours that give you a naturally enhanced look.
i). Â For lips, try NARS Dolce Vita – Â another beauty cult favourite. Â The dusty rose tone gives that ‘your lips but better’ effect – you need only Google it to see the wide ranges of skin tones that it flatters. Â It’s a sheer tone so the colour that results depends on the natural tone of your lips – the general consensus is that it gives lips a rosy colour that’s a couple of shades darker than your own lips – hence the consistent “your lips but better” label! Â Of course, some brides prefer to have their lipstick colour lighter than their own natural lip colour (I fall into that category as my lips are fairly red pigmented). Â Whatever colour you decide on, make sure your neutral lip colour has just a touch of pink or peach in it so that your lips don’t look flat…and so that you don’t look sickly in your photos! Â (Nude lips work on the runway and in magazines – not down the aisle!)
ii). Â For cheeks, try Bobbi Brown’s Desert Pink blush, a gorgeous universally flattering shade that is also in the dusty rose family. Â Desert Pink is the perfect complement for strong eyes – it defines the cheeks and adds a hint of colour, without looking overdone.
Most brides that I work with usually fall somewhere between this Sultry look and the Romantic look when choosing their make-up look for the Big Day.  I would say most like to focus on playing up their eyes versus their lips…and that’s a make-up style that I naturally gravitate towards as well.
What do you think? Â Do the eyes say it all for you? Â Let me know if you’ll say yes to this Sultry bridal beauty look!


