 I recently held a make-up lesson with two amazing and quick-learning clients (thanks A. and S.!). We focused on doing a smoky eye look for the lesson, and it reminded me how (understandably!) many women have questions on how to do it or how to improve on it.
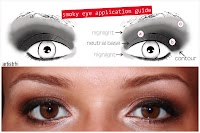
The template at right (an oldie but a goodie!) is meant to be an approximate guideline for where the shades of eyeshadow go. Keep it in mind (and click it to enlarge it) – we’ll refer back to it frequently throughout the next few posts we do on the smoky eye technique.
—–
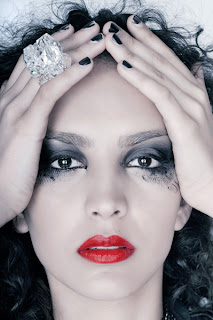
Smoky Eye FAQ #5: How do I prevent my smoky eye from smudging? Once you have carefully applied and perfected your application, the next challenge is getting the smoky eye look to last. The last thing you want is a smoky eye that bleeds underneath the eye and smudges where you don’t want it to, inevitably drawing attention to undereye circles! I know, grrr.
So, now that you’ve gone through the past few posts and are on your way to becoming an expert in achieving the look, here are even more artist tips to get a smoky eye that lasts!
1. Apply make-up in layers.
Make-up always works better in layers. For instance, think of your face make-up: for a long-lasting look, you apply primer, then your foundation and then you set it with your powder. The same principle applies when doing a smoky eye – doing it in layers will help it to go the distance.
- Use an eyeshadow primer or a neutral coloured cream eyeshadow as a base.
Depending on the skin tone, I like to use MAC Paint (in Bare Canvas for light to medium skin tones or in Sublime Nature for deeper medium to dark skin tones) and apply it all over the eyelid. You can also use a cream eyeshadow that co-ordinates with the colour of eyeshadow you’re applying – doing so will kick up its intensity and make it longer-lasting. Other products that work well as a base include the gorgeous cream eyeshadows of Laura Mercier’s Creme Eye Colour collection, and Urban Decay’s Eyeshadow Primer Potion, a product held in high regard by beauty enthusiasts. - Layer, blend, layer, blend, blend, etc.
Use a cream eyeshadow but set it by applying a matching eyeshadow colour or dusting some loose translucent powder atop. The powder will help to reduce any creasing of the cream eyeshadow and can dually intensify the look. If you’re using a pencil eyeliner to rim the eyes, you can also apply a matching eyeshadow or set it with powder to help to lock it in.
2. Use waterproof products.
I’ve mentioned it here on the blog before, but I have some seriously oily lids that give any ‘smudgeproof’ product a run for its money! To get my eye make-up to last, I always have to wear a cream eyeshadow as a base and stick to using waterproof eye make-up products only. That application of cream eyeshadow helps to act as a barrier for when the natural moisture of my oily lids eventually builds up throughout the day. At the end of the day, there’s noticeably less creasing and my eyeliner remains intact!
When I work with brides that need their make-up to last through tears, sweat and a 16+ hour day, I’ll opt to use either a liquid liner or a gel liner for their ability to be long-lasting and waterproof. If you prefer pencil, choose waterproof eyeliners vs khol eyeliners. Same deal with mascara – choose a smudgeproof/waterproof formula to help keep it all in check!
3. Avoid wearing eyeliner on the bottom lashline and lining the inner rim.
Lining the inner rim (aka the waterline) of the eye is such a gorgeous, sultry look, but the trade-off is that the look becomes more prone to smudging. The ‘waterline’ borders the eye and is wet by nature – any type of eyeliner (even waterproof ones) will have trouble holding to a surface that’s wet rather than dry. (Note: I would avoid lining the inner rim altogether if you have watery eyes). If you must wear eyeliner on the bottom, concentrate it on the outer corner of the eye. Remember the layer principle and set the line by applying a matching eyeshadow or dust some translucent powder atop of it.
Overall the smoky eye look isn’t meant to be a perfect, straight-edge look so there’s no need to fret. Some smudging can actually add to the effect of a smoky eye! Of course, just make sure that the smudging doesn’t stray too far south of the eye (i.e. undereye circle territory!). Keep yourself prepared and carry some q-tips along with your concealer and powder to easily tidy up any smudges that may occur!
Got any more smoky eye questions? Always feel free to email me at rhia[at]artistrhi[dot]com. I hope these Smoky Eye FAQ posts have led to more answers than questions!! :)


